Constructing a Snow Pit Shelter With Insulated Floor Mat
Use firm, granular snow with a handprint test to guarantee structural integrity. Dig a 3×5 foot pit 3 feet deep with slightly inset walls and a domed ceiling. Place a closed-cell foam pad (R-value 2.0+) over a tarp first, then top with an insulated floor mat (R-value 3.0+). Overlap edges to eliminate gaps. Keep a ventilation shaft clear hourly to avoid CO₂ buildup. Choosing the right snow and insulation guarantees warmth and safety. More details on optimizing each layer follow.
Notable Insights
- Use firm, granular snow to dig a 3×5-foot pit 3 feet deep, ensuring walls slope inward slightly for stability.
- Shape a domed ceiling to shed weight and prevent condensation buildup inside the snow pit shelter.
- Test snow strength by packing a brick; only proceed if it holds shape without cracking.
- Lay an insulated floor mat with R-value 3.0+ as the topmost base layer to prevent heat loss to snow.
- Maintain an open ventilation shaft and check hourly to avoid blockage, ensuring safe air circulation.
Choose the Right Snow for a Stable Shelter
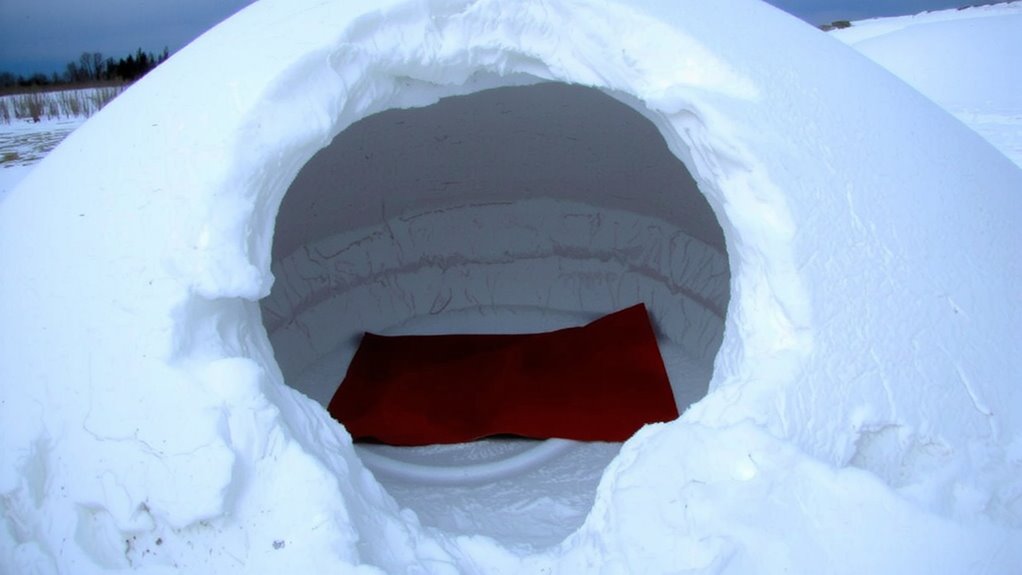
The best snow for building a stable pit shelter is firm and granular, not powdery or slushy-think the kind you’d find after a couple of freeze-thaw cycles. You need high snow density because it directly affects structural integrity. Light, fluffy snow lacks cohesion and collapses under pressure, while overly wet snow is heavy and unstable when it refreezes. Aim for snow you can pack tightly without it cracking or dripping. When you press your hand into it, it should hold a dent without crumbling. This density guarantees the walls and roof won’t sag or fail. You’re not just shaping snow-you’re engineering a space where stability saves heat and life. Test it by forming a snow brick; if it holds shape, it’s likely strong enough. Poor snow choice risks collapse, regardless of design. Your shelter’s safety depends on this first, measurable decision.
Dig Your Snow Pit Shelter Step by Step
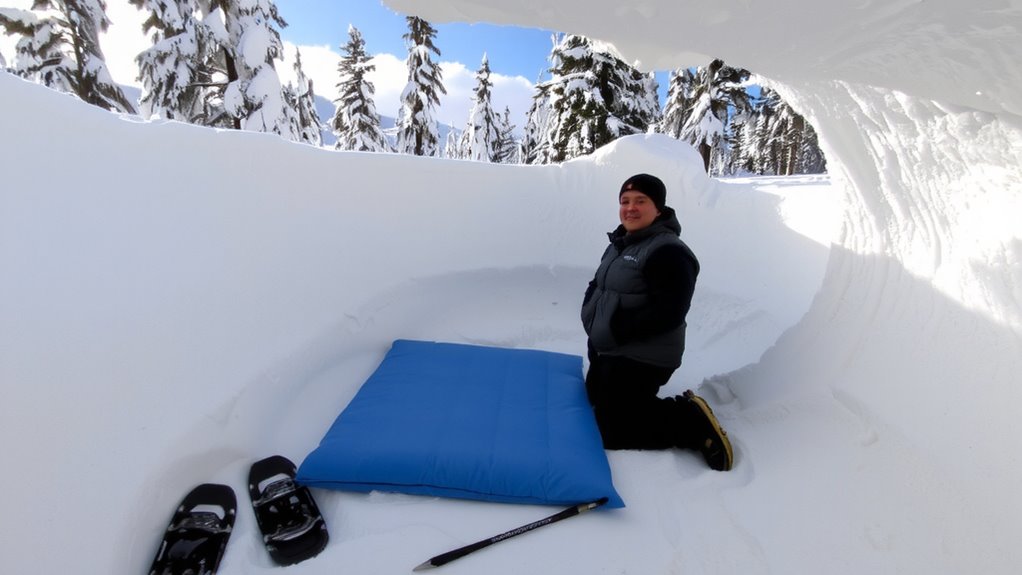
Your safest bet starts with marking out a rectangular footprint, roughly 3 by 5 feet, wide enough to lie down in but narrow enough to retain heat-spaciousness costs warmth, and in snow shelters, volume must earn its keep. Begin digging straight down, removing snow evenly to maintain consistent wall thickness. Prioritize firm, compacted layers; poor snow density leads to collapse risks, especially near the top. Once you’re about 3 feet deep, start shaping the walls inward slightly-this improves structural integrity and reduces cold air pooling. Use wall shaping to create a domed ceiling effect, which helps shed weight and directs condensation away. Keep the floor slightly lower at your feet than your head for better heat retention. Work methodically-rushed digging destabilizes the structure. Check consistency as you go: hard-packed snow holds shape, while loose powder requires reconsolidation. Each movement should serve function, not convenience.
Add Insulation to Prevent Heat Loss
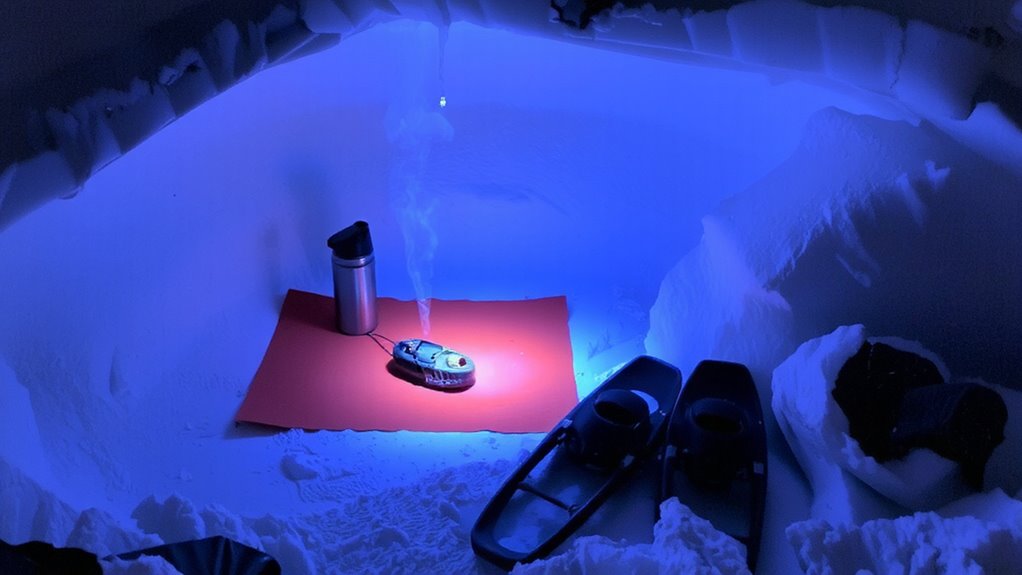
A well-insulated floor makes all the difference in a snow pit, and that means blocking conductive heat loss before settling in. Thermal barriers like closed-cell foam pads or reflective foil layers reduce heat transfer markedly-foam pads with R-values of 2.0 or higher perform reliably in sub-zero conditions. Without ground insulation, your body heat drains quickly into the snow, increasing fatigue and cold stress. Snow itself isn’t enough; it compresses and loses insulating ability under weight. Adding synthetic insulation between you and the snow creates a stable buffer. Materials matter-avoid cotton, which retains moisture, and opt for vapor-resistant options that maintain loft. Some use emergency mylar blankets as a radiant barrier, but they offer minimal R-value alone. Combine layers: a foam pad over a tarp works better than either alone. Test combinations in mild cold first to avoid failures when temperatures drop. For added thermal efficiency, consider high-quality best Mylar blankets designed specifically for cold-weather survival.
Install an Insulated Floor Mat for Warmth
You’ve already blocked conductive heat loss with proper materials, so now it’s time to put those layers to work underfoot. An insulated floor mat acts as a critical thermal barrier, stopping heat from escaping into the snow. Closed-cell foam or inflatable sleeping pads with an R-value of 3.0 or higher perform best in subzero conditions. These materials provide reliable floor heating by reducing ground contact and limiting heat transfer. Standard foam pads weigh less and won’t puncture, but inflatable options offer better insulation and comfort if maintained properly. Place the mat as the topmost base layer, ensuring no gaps along edges. Overlapping multiple mats can increase effectiveness in extreme cold. Avoid thin or untested materials-they fail under sustained exposure. A good setup keeps your core temperature stable throughout the night. Thermal barriers aren’t optional; they’re required for safe, effective snow pit use. For optimal warmth, consider choosing one of the best winter sleeping pads based on insulation performance and durability.
Stay Safe: Ventilation and Overnight Tips
While building a snug shelter matters, skipping ventilation risks carbon dioxide buildup that can impair judgment or worse. You must address carbon monoxide risks, especially if using a stove or candle inside. Keep a small vent hole open at the top of your shelter to allow airflow without sacrificing warmth. Check it hourly during sleep to prevent blockages from snow or ice. Use emergency signals only if needed-carry a whistle or mirror, not open flames, to avoid fumes.
| Tip | Purpose | Trade-off |
|---|---|---|
| Ventilation shaft | Reduces CO₂ and carbon monoxide risks | Slight heat loss |
| Hourly checks | Guarantees airflow remains unblocked | Interrupts sleep |
| Whistle for emergency signals | Effective, safe | Limited range in wind |
Stay alert. Survival depends on consistent, simple actions.
Gather the Right Tools Before You Start
The right tools make the difference between a shelter that holds and one that fails. For effective tool selection, start with a sturdy snow saw or folding shovel-they cut through compact snow faster than hands or trekking poles. A probe or ski pole helps test snow depth and stability before digging. Your insulated floor mat needs securing, so bring cordage or webbing. Always wear safety gear: goggles protect your eyes from snow chips, and insulated, waterproof gloves keep hands functional in cold. A helmet is wise if above-treeline or in avalanche terrain. Headlamp with extra batteries guarantees visibility during shorter winter days. Each item weighs little but adds critical function. Poor tools slow progress and increase exposure. Choose gear that balances weight, durability, and performance. Test everything at home. You won’t fix flaws once you’re out there. A reliable camping shovel can greatly enhance your ability to construct a stable snow pit shelter efficiently.
On a final note
You’ve built a stable snow pit using dense, compacted snow and added an insulated floor mat-critical for cutting ground heat loss. The mat’s R-value matters; aim for 2.0 or higher. Ventilation holes prevent CO₂ buildup. This shelter works in -15°C winds if properly dug. It’s lighter than a quinzhee but less durable. Trade ease of setup for lower long-term insulation. Test your local snow cohesion first-it makes or breaks the build.